¡Como Hacer una Magnífica Pulsera Animal Print
de Principio a Fin!
How to Make a Gorgeous Animal Print Bracelet
From Begining to End!

Nuestras pulseras Animal Print fueron un gran éxito esta Navidad y todavía lo son. La tendencia sigue y seguirá durante algún tiempo, así que decidimos hacer nuestro primer Tutorial de una Pulsera Animal Print con Dijes. Si tienes conocimientos básicos de joyería artesanal, es muy fácil de hacer y terminarás con una magnifica pulsera.Recuerda que si cambias las piedras, adornos y dijes, puedes tener un diseño completamente diferente. ¡Vamos a hacerla!
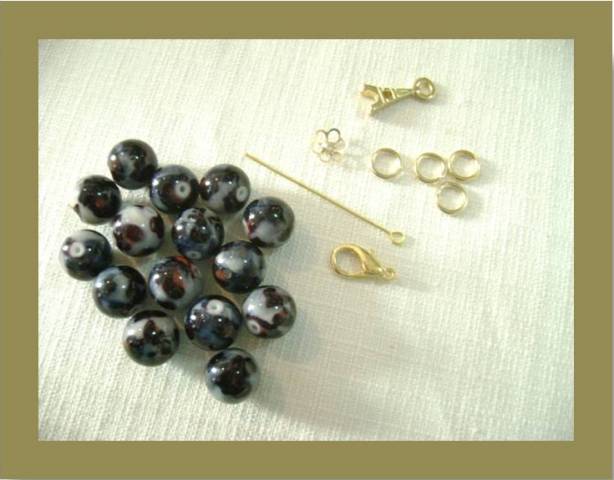
Materiales necesarios:
15 piedras o cuentas tamaño 8”
30 cms Hilo Dorado Non Tarnish, 18 gauge
1, 20 m de Hilo Dorado Non Tarnish, 24 gauge
1 alfiler de argolla
1 capuchón
1 dije
4 aros abiertos de 6 o 7 mm
1 cierre
Our Animal Print bracelets were a big hit this Christmas and still are. The trend continues and will go on for some time, so we decided to make our first Tutorial of an Animal Print Charm Bracelet. If you have basic knowledge in craft jewelry, it is very easy to make and you’ll end up with a gorgeous bracelet. Keep in mind that if you change the beads, adornments and charms, you can have a completely different design. Let’s get to it!
Materials needed:
15 beads size 8”
30 cms of Non Tarnish Artistic Wire, 18 gauge
1, 20 m of Non Tarnish Artistic Wire, 24 gauge
1 bead pin
1 bead cap
1 charm
4 open jump rings, 6 or 7 mm
1 clasp

Empieza por hacer una argolla en una punta del hilo de 18 gauge. Pasa 14 piedras o cuentas por el hilo y termina el otro lado con otra argolla. Ya tienes una pulsera que se ve como esta.
Start by making a small loop at one end of the 18 gauge wire. Pass 14 beads through the wire and end with another small loop on the other side. You’ll already have a bracelet that looks like this.

Aquí está un acercamiento para que veas los detalles.

Ahora toma el hilo 24 gauge y córtalo a la mitad.Toma una de las mitades (60 cms de largo) y dóblala otra vez a la mitad, sin cortar. Envuelve una de las puntas (ambos hilos) alrededor de una de las argollas y termina muy bien, usando tus pinzas. Empieza a enrollar alrededor de cada piedra o cuenta. Mantenlos siempre en el mismo lado de la piedra o cuenta para un mejor efecto. Cuando el hilo se está terminando, solo enróllalo entre dos piedras. Una vez más, cuida la terminación, usando tus pinzas.
Now pick up your 24 gauge wire and cut it in half. Grab one of those halves (60 cms long) and fold it again in half without cutting. Wound one end of the tips (both wires) around one of the loops and tidy it up with your pliers so it’s nicely finished. Now start winding the wires around each bead. Keep the tops on the same sides of the beads for a better effect. When the wire is ending just wound it between two beads. Once again tidy it up with your pliers.

En esta etapa, se verá así.

Dobla a la mitad los otros 60 cms de hilo 24 gauge y esta vez enrolla complemente uno en el otro. Una vez más, enrolla una de las puntas (ambos hilos) alrededor de la argolla del otro lado y termina bien con las pinzas. Empieza a enrollar los hilos alrededor de cada piedra o cuenta y recuerda mantenerlos siempre del mismo lado. Toma en cuenta que los hilos enrollados uno con otro se convertirán en mucho más cortos que los anteriores, aunque empiezas con el mismo largo.
Now fold in half the other 60 cms of 24 gauge wire and this time braid them completely. Once again wound one end of the tips (both wires) around the loop on the other side and tidy it up with your pliers. Start winding the wires around each bead and remember to keep the tops on the same sides of the beads. Note that the braided wire will become much shorter than the first one, although you start out with the same length.

Cuando los hilos se están terminando solo enróllalos entre dos piedras o cuentas y termina con tu pinza. Este es el resultado.
When the wire is ending just wound it between two beads and tidy it up with your pliers. This is the end result.

Nota: Puedes elegir usar los hilos simples o los hilos enrollados en sí mismos para toda la pulsera. También puedes enrollarlos en un solo lado o cualquier otra combinación que se te ocurra.

Vamos a agregar un aro y el cierre a una punta…
Now let’s attach an open jump ring and clasp to one end…

… y dos o tres aros en la otra punta.
Si haces esta pulsera para tu uso personal puedes preferir usar un solo aro. Si la haces para vender o para hacer un regalo, es mejor anexar dos o hasta tres aros para tomar en cuenta los diferentes tamaños de muñecas.
If you are making this bracelet for yourself, you might prefer to use just one ring. If you are making it for sale or a gift, it’s better to attach two or even three rings to account for different wrist sizes.

Una pulsera casi terminada.

En este momento vamos a preparar la piedra o cuenta No. 15 para transformarla en un dije. Pasa el alfiler por el hueco, agrega el capuchón, corta el exceso y haz una argolla usando las pinzas.
At this time we just have to prepare the 15th bead to turn it into a charm. Pass the pin through the bead, add a bead cap, cut the excess off and make a loop using the pliers.

Usa el ultimo aro para agregar la piedra o cuenta convertida en dije, así como otro dije de tu elección.
Los dijes no son solamente adornos; su peso mantendrá los aros y el cierre en la parte inferior de tu muñeca, así que es importante que los uses.
Use the last open jump ring to add the charm bead as well as another charm of your choice.
Charms are not only adornments, their weight will keep the bracelet jump rings and clasp on the lower side of your wrist, so it’s important that you use them.

Y aquí está terminada tu magnífica y sensual Pulsera de Animal Print con Dijes, lista para ser usada con aquel look en el que ya estás pensando ¿cierto?
And here is your finished gorgeous and sensual Animal Print charm bracelet, ready to use with that great outfit you’re already thinking about, right?
Esperamos que hayas disfrutado este tutorial, el primero de muchos que pensamos hacer especialmente para ti.
Haznos un favor: si haces una pulsera siguiendo este Tutorial, ¿nos enviarás una foto para publicar aquí mismo? O tal vez solo deja un comentario diciéndonos si te gustó y como resulto tu pulsera. ¡Gracias!
We hope you enjoyed this Tutorial, the first of many we plan to make especially for you.
Please do us a favor: if you make a bracelet following this Tutorial, will you send us a photo to publish right here? Or maybe just leave a comment telling us if you found it helpful and how your bracelet turned out. Thank you!

Nuestras pulseras Animal Print fueron un gran éxito esta Navidad y todavía lo son. La tendencia sigue y seguirá durante algún tiempo, así que decidimos hacer nuestro primer Tutorial de una Pulsera Animal Print con Dijes. Si tienes conocimientos básicos de joyería artesanal, es muy fácil de hacer y terminarás con una magnifica pulsera.Recuerda que si cambias las piedras, adornos y dijes, puedes tener un diseño completamente diferente. ¡Vamos a hacerla!
Materiales necesarios:
15 piedras o cuentas tamaño 8”
30 cms Hilo Dorado Non Tarnish, 18 gauge
1, 20 m de Hilo Dorado Non Tarnish, 24 gauge
1 alfiler de argolla
1 capuchón
1 dije
4 aros abiertos de 6 o 7 mm
1 cierre
*******
Our Animal Print bracelets were a big hit this Christmas and still are. The trend continues and will go on for some time, so we decided to make our first Tutorial of an Animal Print Charm Bracelet. If you have basic knowledge in craft jewelry, it is very easy to make and you’ll end up with a gorgeous bracelet. Keep in mind that if you change the beads, adornments and charms, you can have a completely different design. Let’s get to it!
Materials needed:
15 beads size 8”
30 cms of Non Tarnish Artistic Wire, 18 gauge
1, 20 m of Non Tarnish Artistic Wire, 24 gauge
1 bead pin
1 bead cap
1 charm
4 open jump rings, 6 or 7 mm
1 clasp
Empieza por hacer una argolla en una punta del hilo de 18 gauge. Pasa 14 piedras o cuentas por el hilo y termina el otro lado con otra argolla. Ya tienes una pulsera que se ve como esta.
*******

Aquí está un acercamiento para que veas los detalles.
*******
Here’s a closeup for more detail.
Ahora toma el hilo 24 gauge y córtalo a la mitad.Toma una de las mitades (60 cms de largo) y dóblala otra vez a la mitad, sin cortar. Envuelve una de las puntas (ambos hilos) alrededor de una de las argollas y termina muy bien, usando tus pinzas. Empieza a enrollar alrededor de cada piedra o cuenta. Mantenlos siempre en el mismo lado de la piedra o cuenta para un mejor efecto. Cuando el hilo se está terminando, solo enróllalo entre dos piedras. Una vez más, cuida la terminación, usando tus pinzas.
*******
Now pick up your 24 gauge wire and cut it in half. Grab one of those halves (60 cms long) and fold it again in half without cutting. Wound one end of the tips (both wires) around one of the loops and tidy it up with your pliers so it’s nicely finished. Now start winding the wires around each bead. Keep the tops on the same sides of the beads for a better effect. When the wire is ending just wound it between two beads. Once again tidy it up with your pliers.

En esta etapa, se verá así.
*******
At this stage you will have this.
Dobla a la mitad los otros 60 cms de hilo 24 gauge y esta vez enrolla complemente uno en el otro. Una vez más, enrolla una de las puntas (ambos hilos) alrededor de la argolla del otro lado y termina bien con las pinzas. Empieza a enrollar los hilos alrededor de cada piedra o cuenta y recuerda mantenerlos siempre del mismo lado. Toma en cuenta que los hilos enrollados uno con otro se convertirán en mucho más cortos que los anteriores, aunque empiezas con el mismo largo.
*******
Now fold in half the other 60 cms of 24 gauge wire and this time braid them completely. Once again wound one end of the tips (both wires) around the loop on the other side and tidy it up with your pliers. Start winding the wires around each bead and remember to keep the tops on the same sides of the beads. Note that the braided wire will become much shorter than the first one, although you start out with the same length.

Cuando los hilos se están terminando solo enróllalos entre dos piedras o cuentas y termina con tu pinza. Este es el resultado.
*******

Nota: Puedes elegir usar los hilos simples o los hilos enrollados en sí mismos para toda la pulsera. También puedes enrollarlos en un solo lado o cualquier otra combinación que se te ocurra.
*******
Note: You can choose to use the simple double wires over the whole bracelet, or go over it completely with the braided wires. You can also wound any of them only over one side of the bracelet or any other combination you can think of.
Note: You can choose to use the simple double wires over the whole bracelet, or go over it completely with the braided wires. You can also wound any of them only over one side of the bracelet or any other combination you can think of.

Vamos a agregar un aro y el cierre a una punta…
*******

… y dos o tres aros en la otra punta.
Si haces esta pulsera para tu uso personal puedes preferir usar un solo aro. Si la haces para vender o para hacer un regalo, es mejor anexar dos o hasta tres aros para tomar en cuenta los diferentes tamaños de muñecas.
*******
…and two or three jump rings to the other end. If you are making this bracelet for yourself, you might prefer to use just one ring. If you are making it for sale or a gift, it’s better to attach two or even three rings to account for different wrist sizes.

Una pulsera casi terminada.
*******
An almost completed bracelet.
En este momento vamos a preparar la piedra o cuenta No. 15 para transformarla en un dije. Pasa el alfiler por el hueco, agrega el capuchón, corta el exceso y haz una argolla usando las pinzas.
*******
At this time we just have to prepare the 15th bead to turn it into a charm. Pass the pin through the bead, add a bead cap, cut the excess off and make a loop using the pliers.

Usa el ultimo aro para agregar la piedra o cuenta convertida en dije, así como otro dije de tu elección.
Los dijes no son solamente adornos; su peso mantendrá los aros y el cierre en la parte inferior de tu muñeca, así que es importante que los uses.
*******
Charms are not only adornments, their weight will keep the bracelet jump rings and clasp on the lower side of your wrist, so it’s important that you use them.

Y aquí está terminada tu magnífica y sensual Pulsera de Animal Print con Dijes, lista para ser usada con aquel look en el que ya estás pensando ¿cierto?
*******
Esperamos que hayas disfrutado este tutorial, el primero de muchos que pensamos hacer especialmente para ti.
Haznos un favor: si haces una pulsera siguiendo este Tutorial, ¿nos enviarás una foto para publicar aquí mismo? O tal vez solo deja un comentario diciéndonos si te gustó y como resulto tu pulsera. ¡Gracias!
*******
We hope you enjoyed this Tutorial, the first of many we plan to make especially for you.
Please do us a favor: if you make a bracelet following this Tutorial, will you send us a photo to publish right here? Or maybe just leave a comment telling us if you found it helpful and how your bracelet turned out. Thank you!
Había hecho este tipo de pulsera de forma empírica (a mi estilo). Ahora copié este tutorial y luego les mostraré como me queda usando la técnica que uds. proponen aquí. Ya se las mostraré.
ResponderBorrarGracias por compartir!. Buen regalo de Navidad!
luvargo
Hola de nuevo Luvargo, gracias por tu comentario y quedamos en espera de tu foto! Hay muchas técnicas, si quieres compartir las tuyas con nosotras, con gusto las publicaremos. Feliz Navidad!
ResponderBorrarThanks for this tutorial. I'm new at this and like to see different things.
ResponderBorrarHi Beetique, glad you liked it. We'll contine to publish tutorials once in a while so come and visit often. Would love to see some photos of your version. Very nice and original bracelet at your blog.
ResponderBorrarbella
ResponderBorrar